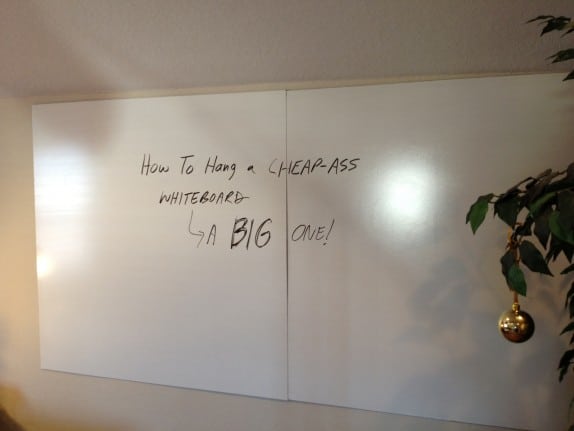
Steps on how to get a big Whiteboard within a small budget
I did some research. I got some advice from some internet marketing friends. And I arrived at a solution. For less than 10% of the cost of a comparably sized whiteboard pre-built, I got the job done.
Why A Whiteboard?
Whiteboards are a favorite tool among many internet marketers I know. Many others have hung them with the best intentions, only to rarely (if ever) actually use it. So, the question is… What use is a whiteboard? Why would I want one?
- Diagramming A Sales Process. When you’re planning out a sales funnel, it is nice to diagram it out visually. This includes the landing pages, thank-you pages, upsells, downsells – you get the idea. And even though you can do this with flow chart software, hashing it out on a whiteboard often works better. Plus, you don’t get mired down with trying to figure out the software or some compulsion to make it look pretty.
- Videos. Recording yourself on video talking about something, but in front of your whiteboard so you can draw out what you’re talking about, all professor-style.
- Projects and Planning. Obvious.
- Model a product launch. There can be a lot of moving pieces to a product launch. Map it out on the whiteboard.
You get the idea. Yes
Whiteboard On The Cheap
Small whiteboards are easy to come by, but their size is usually a limitation. Hell, my computer monitor is bigger than some of those things.
Once you move up to something of decent size, you have to pony up some serious scratch. The larger (usually commercial-grade) whiteboards can cost several hundred dollars.
Then, you have paint options. For example, companies like IdeaPaint orWhiteyboard have paint-on options. You literally just paint your wall with this material and it turns the entire wall into a dry-erase whiteboard. This is probably your best option if you truly want wall-to-wall whiteboards.
Whiteyboard also has adhesive options. You buy the whiteboard material in a roll and you, well, roll it on.
As convenient as these options are, the problem is that you need a very smooth service. A standard texture on drywall should work OK with paint because the paint will even out as it dries (in theory). Some walls, though, have a more pronounced texturing to them. That would make the whiteboard surface bumpy and that’s annoying. Same problem with the adhesive.
The other thing to consider is removability. Paint-on whiteboard is, I would imagine, pretty much a bitch to remove. So, if you’re in an apartment or in a rental house (as I am right now), it might not be a viable option. You want to be able to move out and leave the walls undamaged.
So, This Is What I Did…
I went to Lowes and picked up an 8’x4′ white panelboard. This is the kind of board which would be wall-mounted in a cheap bathroom or something. It happens to make a pretty decent dry-erase board, though.
The price of the board (at Lowes) was $11.87 per panel. If you wanted more than one, I bet you could afford it. 
The biggest problem is fitting in in your car. You pretty much want to have it inside the vehicle. A flat item like this would act as one HELL of a sail if the wind caught it, so roof-mounting it might prove problematic. I couldn’t even fit this thing in my wife’s SUV, so I actually had to have the folks at Lowes cut the board for me. I had them cut it right down the middle, so I had TWO 4’x4′ boards.
To mount it to the wall, you have a couple different options. One is, of course, adhesive. A simple tube of liquid nail would do it. Just keep in mind that this would screw up the wall if you try to remove it.
The way I mounted it? Velcro. Industrial stength velcrow tape, as shown here: (link to Lowes)

Since I had two separate 4×4 panels, I cut up the velcrow tape evenly and stuck strips in each of the 4 corners of each board. I actually placed the strips a few inches inward on each corner, not right at the edge. This velcrow is more than adequate to hold up the weight of this panel.
Don’t worry about measuring it precisely and trying to match it up on the wall. I’d recommend pre-fastening the velcrow before wall-mounting it. Then, you simply position the wall panel and stick it onto the wall. Then, pushing inward to really stick those things to the wall. This saves a lot of hassle from trying to match up the locations of the two sides to the velcrow.
The End Result

There you have it.
The ONLY problem with this is the fact that I had to cut it in half to even get it home. I now have this seam (which is pretty visible) in the middle of it. In practice, I doubt it will be any problem. Worse case, I could probably reduce the seam with some chaulking or something.
All in all, though – pretty dang swanky. And, panel and velcro, my total cost was only about $20 or so. When you consider what a whiteboard this size would have cost pre-built, pretty sweet. 
No comments:
Post a Comment